Bathroom Faucet & Sink Hookups After Countertop Install
New countertop in, but no working sink yet? Here’s how we help homeowners choose the right faucet height, hole layout, and plumbing parts for a trouble-free hookup.
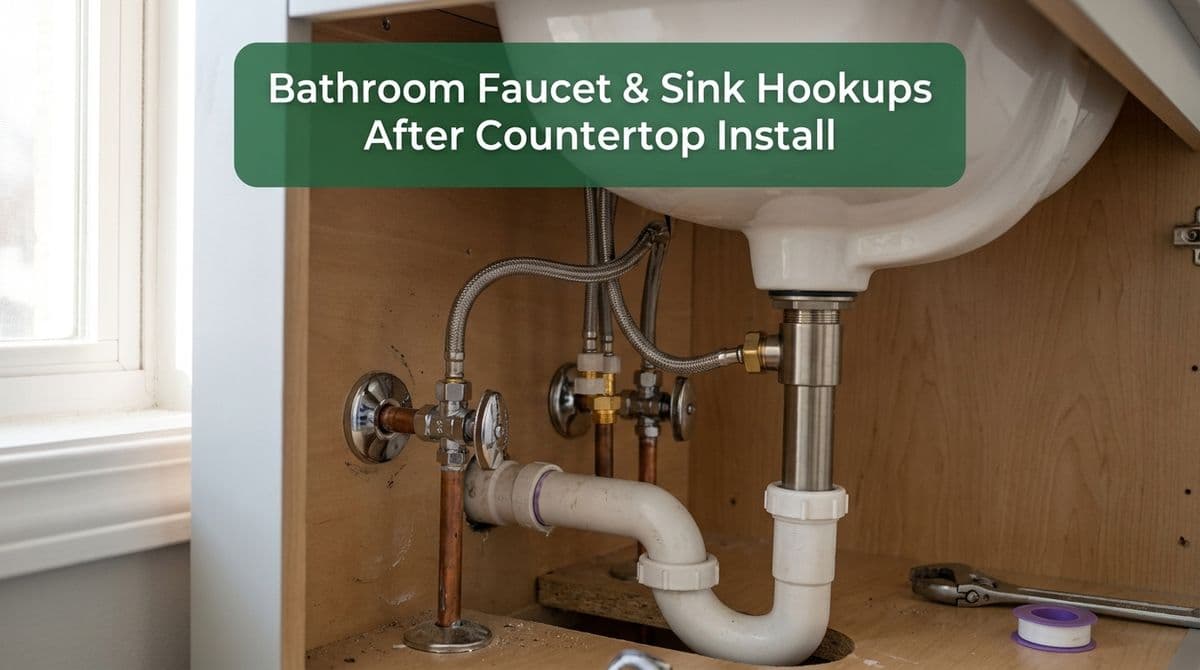
Helping a Homeowner Finish a Bathroom After New Counters
We recently got a call from a homeowner — let’s call her Lisa — who had just had beautiful new bathroom countertops installed. The water lines had already been roughed in and capped in the wall, but nothing was actually hooked up yet.
Lisa told us, “I measured the faucet height, and it’s kind of a short distance to open the medicine cabinet door.” On top of that, she’d ordered a single-hole, matte black faucet and only had one hole drilled in the countertop… then found out the three-hole versions she liked were actually shorter.
She asked us to come out and quote the whole hookup: angle stops, supply lines, P-trap, and possibly a new faucet that would actually fit under the cabinet door. We see this situation a lot right after countertop installs, so I thought I’d walk through how we help homeowners like Lisa make the right choices.
Step 1: Check Faucet Height and Medicine Cabinet Clearance
The first thing we look at in a bathroom like Lisa’s is the relationship between three things:
- Countertop surface
- Faucet overall height
- Medicine cabinet or mirror frame
In Lisa’s case, the distance from the countertop to the bottom of the medicine cabinet was just under eight inches. Many popular single-handle faucets are 8–10 inches tall, which means the handle or spout can hit the cabinet door when it swings open.
When we’re onsite, we usually:
- Measure from the countertop to the cabinet (or mirror frame).
- Check the faucet spec sheet for overall height and handle clearance.
- Make sure there’s space to swing the handle without hitting the cabinet or backsplash.
As a general rule, you want your faucet to be at least 1–1.5 inches shorter than the available vertical space, especially with medicine cabinets that open outward.
Step 2: Single-Hole vs. Three-Hole Faucet Configurations
Lisa had another very common surprise: she’d chosen a single-hole faucet and had the fabricator drill one hole in the new countertop. Only later did she realize that some of the shorter faucets she liked were actually three-hole models.
Here’s how we break down your options once the countertop is already drilled:
- Single-hole drilled, want a single-hole faucet: Easiest option. Just pick a faucet that fits the height and style you want.
- Single-hole drilled, like a three-hole faucet: You can sometimes use a deck plate (escutcheon) that covers three holes with a single-hole faucet, but not the other way around without more stone work.
- Three-hole drilled, want a single-hole faucet: Many single-hole faucets include a plate to cover the extra two holes.
If you’re still in the planning stage and haven’t drilled yet, decide first:
- Do you prefer a single-handle or two-handle look?
- Do you want a widespread faucet (handles spread apart) or a centerset (compact base)?
Then let your plumber or countertop fabricator know before they cut anything. Once those holes are drilled in granite, quartz, or marble, changing them can be expensive or impossible.
Step 3: Choosing the Right Angle Stops, Supply Lines, and P-Trap
Behind Lisa’s shiny new vanity, the water lines were roughed into the wall and plugged off. To finish the install, we needed to add all the “hidden” parts that actually make the sink work:
Angle Stops (Shut-Off Valves)
Angle stops are the small shut-off valves that connect your home’s water supply to the faucet via flexible lines. For a new bathroom hookup, we typically recommend:
- Quarter-turn ball valves (easier and more reliable to shut off than old-style multi-turn valves).
- Matching the pipe type in the wall (copper, PEX, or CPVC) with the correct connection style.
- Installing one for hot and one for cold, and sometimes a third if there’s a separate sprayer or bidet feature.
Supply Lines
From the angle stops, we run flexible stainless steel braided supply lines up to the faucet. When we select them, we look at:
- Length: Long enough to reach without strain, but not so long they’re bunched up under the sink.
- Connection size: Matching the faucet inlets and the angle stops (usually 3/8" at the valve).
- Quality: We stick with proven brands to reduce leak risk.
P-Trap and Drain Parts
The P-trap is the curved pipe under your sink that prevents sewer gases from coming back into the bathroom. When installing after a new countertop, we make sure:
- The sink drain outlet and the wall drain line up properly.
- We’re using the right materials (often PVC for residential bathrooms, sometimes chrome-plated for exposed installs).
- All slip-joint connections are hand-tightened and checked for leaks after running water.
Quick Checklist for Homeowners After a Countertop Install
If you’re in the same boat as Lisa and your bathroom countertop is in but the sink isn’t hooked up yet, here’s a simple checklist before we (or any plumber) arrive:
- Measure from countertop to bottom of medicine cabinet or mirror frame.
- Write down your faucet height and model (or what you’re considering buying).
- Confirm how many holes are drilled in the countertop and their spacing.
- Check that the sink and drain are installed securely in the countertop.
- Make sure the shut-off area under the sink is clear so we can access the pipes.
Having those details ready helps us bring the right parts and give you accurate options and pricing on the first visit.
Common Mistakes to Avoid With New Bathroom Hookups
Over the years, we’ve seen a few patterns that cost homeowners extra time and money. Here are some things to avoid:
- Ordering the faucet before measuring clearances: Always measure height to cabinets and mirrors first.
- Drilling the wrong hole configuration: Decide on faucet style and hole count before the countertop is cut.
- Using old or mismatched valves and traps: Reusing corroded or undersized parts often leads to leaks later.
- DIY installs without checking codes: Trap configuration, venting, and materials all have code requirements.
- Ignoring access to shut-off valves: Don’t bury valves behind drawers or panels where you can’t reach them in an emergency.
Simple Maintenance Tips After Everything Is Hooked Up
Once we’ve installed the faucet, angle stops, supply lines, and trap, we always walk the homeowner through a few quick maintenance tips:
- Operate the shut-offs once or twice a year so they don’t seize up.
- Check under the sink every few months for signs of moisture, staining, or musty smells.
- Keep the area under the sink uncluttered around the pipes so nothing bumps or stresses the lines.
- If you notice slow draining, call before you reach for harsh chemicals that can damage pipes.
With the right planning and parts, that “almost finished” bathroom can go from decorative to fully functional in just a short visit. If you’re staring at a brand-new countertop and wondering what faucet height, hole configuration, or plumbing parts you need, we’re always happy to come out, take measurements, lay out your options, and get you across the finish line.